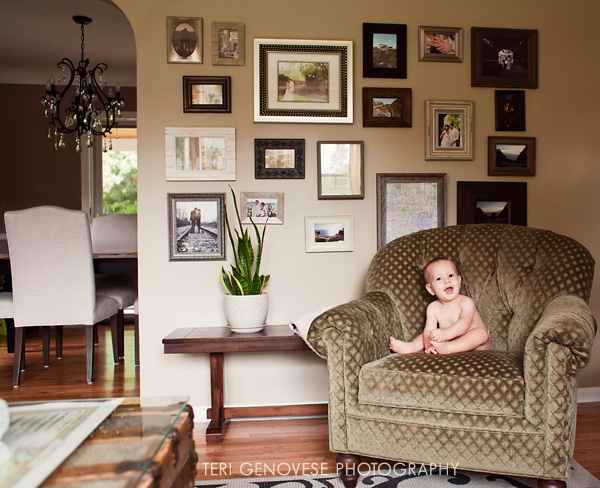
A seasonal change always seems to align with our natural inclination to change, as well. For me personally, it's been about getting back to yoga, purging the excess "stuff" from our home, and simply finding new cute, modern throw pillows to freshen our living space. This Fall, I also naturally have photography on the mind and I'm feeling inspired to shake up the ordinary. Perhaps, your living space is also aching for a change and you have been trying to figure out what to do with your photographs.. Here's some inspiration for doing just that:
Idea I: A Casual, 'Organized yet Random' Wall Arrangement (with no fuss..)
This approach is perfect for wall arrangements that you hope to add to or change over time. In this case my client combined a wide selection of special photographs, from the photos I captured from her engagement session and wedding portraits/reception to their trip to Italy and their destination wedding/honeymoon in St. Lucia. I love that this wall arrangement is a focal point in their living space and celebrates their life before this little bugger came along..
Here's a few simple tips for how it was done:
1) Choose your favorite photos. Get a basic idea of what sizes will be needed to fill the space. Record the quantity of horizontals, verticals, and squares (and your preferred sizes for each). Go with your gut and feature your absolute favorite photographs as the largest prints in your display to act as the focal points.
2) Shop for frames that suit the photographs and coordinate with one another - similar color family, texture, etc. Bring home a few extra frames to play with the options. (Note: Professional matting/framing is always recommended for your professional wall prints, but ready-made frames are great for small prints and snapshots. I just discovered these handmade frames and can't wait to order more for a few of my small photographs.)
3) Simply lay out the framed photos on the floor and move them around until they feel balanced.
4) Transfer the frame layout from the floor to the wall. Surprisingly, my client reported that they just eye-balled the layout without measuring a thing! It may seem too easy, but this is the key to give the look of a casual, organized yet random wall arrangement.
Idea II: A Gallery Wrapped Canvas (in a unique place):
I was so intrigued to see this canvas hung inside this stylish family's buffet cabinet / hutch. It is so perfect and untraditional. It really inspired me to think outside the box for new ways and different areas that can be decorated with photographs. So many people express that they do not have any wall space, but that's when we can get really creative..
For reference, the size of this canvas is 16" x 26."
It's such a treat to return to a client's home after some time has passed and see how they have displayed the photographs from our sessions together. Besides having total house envy, I am often so impressed with the finished result and how my photographs have been incorporated into their personal home decor. A huge thanks to my clients for allowing me to share their beautiful photography displays. I hope these examples and tips will help inspire ideas for incorporating your photographs (professional or personal) into your home decor. Have fun with it!


